

The GitLab Container Registry is more than just a place to store Docker images; it’s a private Docker image registry built right into your GitLab projects. It provides a secure, integrated home for your container images, connecting them directly to your source code and CI/CD pipelines.
Understanding the GitLab Container Registry
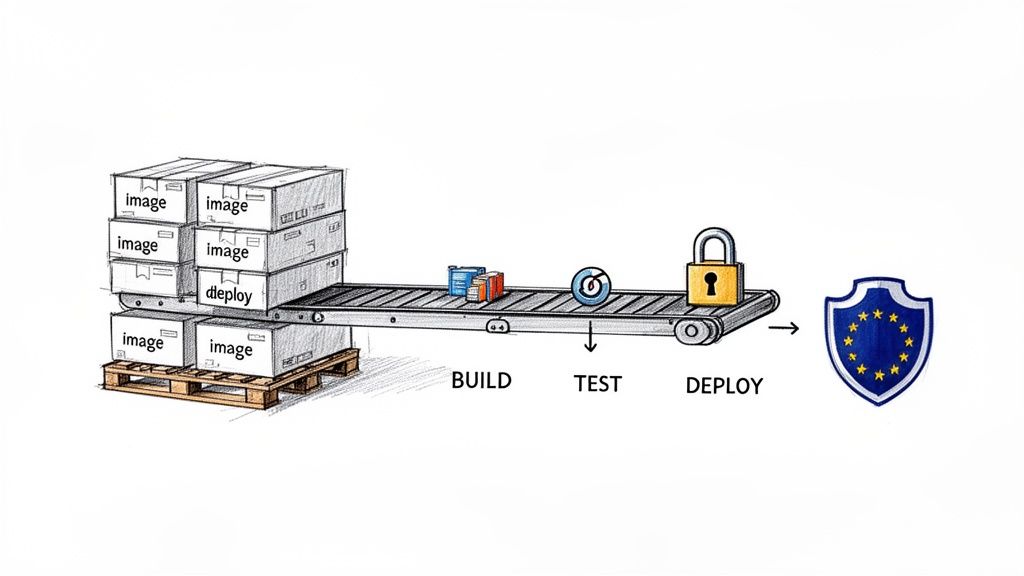
Instead of thinking of a container registry as a separate digital warehouse, imagine it as an intelligent logistics hub located right on your factory floor. In many setups, a developer builds an image and pushes it to a standalone registry like Docker Hub. This creates a disconnect between your code, your images, and your deployment process.
The GitLab Container Registry closes that gap by putting the registry right where the work happens. It’s deeply integrated into the GitLab platform, making it an active and intelligent part of your software supply chain, not just a passive storage location.
This integration allows the registry to act as a central hub, connecting the build, test, and deployment stages of your development workflow into a single, cohesive process.

As the diagram shows, every code change can trigger a pipeline that automatically builds a new image and stores it securely in the registry. That very same image is then pulled for automated testing and deployment, creating a seamless, transparent, and fully automated flow.
Core Benefits of an Integrated Registry
The biggest advantage of using the GitLab Container Registry is its native integration with GitLab CI/CD. This tight coupling simplifies your workflows and dramatically improves your security posture.
Key benefits include:
- Simplified Authentication: CI/CD jobs automatically receive secure, short-lived credentials to push and pull images. You no longer need to manually manage tokens or stuff passwords into your pipeline scripts. For example, the
$CI_REGISTRY_PASSWORDvariable is automatically available in every job. - Integrated Security Scanning: You can scan images for vulnerabilities the moment they are pushed to the registry. Security reports appear directly in merge requests, empowering developers to fix issues before bad code ever gets merged.
- Granular Access Control: Permissions are tied directly to your GitLab project members and their roles. This lets you precisely control who can read (pull) or write (push) images, ensuring only authorised users and pipelines can access them.
A Practical Example
Let’s walk through a common scenario. A developer pushes a code change to a feature branch, which automatically triggers a GitLab CI/CD pipeline. The “build” job kicks off, compiles the code, builds a fresh Docker image, and tags it with the unique commit ID.
That image is then pushed directly to the project’s GitLab Container Registry. Immediately after, a “test” job pulls that exact image and runs a suite of automated tests against it. This simple, powerful sequence guarantees that what gets tested is precisely what was just built, completely eliminating the classic “but it works on my machine” problem.
This seamless handover is a direct result of the registry’s integrated nature, turning what used to be a clunky, multi-step process into a smooth, automated workflow.
Right, let’s get your GitLab Container Registry configured. This is where the theory ends and you start building a solid foundation for your container image workflow. The setup path depends on whether you’re on GitLab.com or running a self-managed instance.
If you’re using GitLab.com, you’re in luck—the registry is already enabled for new projects. No setup needed. Just head to your project’s Deploy > Container Registry page. You should see an empty registry with some handy commands, ready for your first docker push.
For self-managed instances, you’ll need to switch it on yourself. This gives you total control, but it means getting your hands dirty in the main GitLab configuration file, gitlab.rb.
Activating the Registry on a Self-Managed Instance
To bring the registry online on your own GitLab server, you’ll need to edit /etc/gitlab/gitlab.rb, the file that governs your entire GitLab installation.
- SSH into your server and open
/etc/gitlab/gitlab.rbwith a text editor likevimornano. - Find the
registry_external_urlsetting. You’ll need to uncomment it and set it to the URL where your registry will live. It’s common to use a dedicated port like5050for this, especially during initial setup.
Here’s what a typical configuration looks like:
# /etc/gitlab/gitlab.rb

# Define the user-facing URL for the Container Registry.
# Using a port helps isolate the service initially.
registry_external_url 'https://gitlab.example.com:5050'
Once you’ve saved your changes, you must apply them. Run sudo gitlab-ctl reconfigure. This command reads your new settings and reconfigures all the GitLab services, bringing your registry to life.
I’ve seen this trip people up countless times: they edit
gitlab.rbperfectly but forget to reconfigure. The result? A registry that’s configured but not actually running. Always, always runsudo gitlab-ctl reconfigureto make your changes take effect.
Configuring External Object Storage
Out of the box, the GitLab Container Registry stores images on your server’s local disk. This is fine for testing or very small teams, but it’s a recipe for disaster in production. Your server’s disk space will get eaten up fast. A much better approach is to offload image storage to a dedicated object storage service like Amazon S3 or Google Cloud Storage (GCS).
This move dramatically improves scalability and reliability, separating your application data from your image artifacts.
To point your registry to an S3 bucket, for instance, you would add a storage block to your gitlab.rb file with your bucket details and credentials.
# /etc/gitlab/gitlab.rb

registry['storage'] = {
  's3' => {
    'accesskey' => 'YOUR-AWS-ACCESS-KEY',
    'secretkey' => 'YOUR-AWS-SECRET-KEY',
    'bucket' => 'your-gitlab-registry-bucket-name',
    'region' => 'eu-west-1'
  }
}
With this change, GitLab will push all new image layers directly to your S3 bucket instead of the local filesystem. This architecture is practically essential for any team managing a serious number of images or operating under strict compliance rules.
This isn’t just a theoretical best practice. For example, it’s becoming a key strategy in Spain’s tech manufacturing sector. Data shows that 72% of IoT vendors in the ES region are adopting the GitLab Container Registry to help them meet stringent Cyber Resilience Act (CRA) prerequisites. For these teams, migrating an average project size of 500 GiB to S3 takes just 28 minutes—an 84% time saving that is vital for the agile updates the CRA demands. You can read more about these GitLab Container Registry adoption trends at firstsales.io.
Working with Images in CI/CD and the CLI
Once your GitLab Container Registry is active, it’s time to start using it. This is where your containerised applications will live. You’ll interact with it in two main ways: manually from your command line for local development, and automatically through GitLab CI/CD pipelines for builds and deployments.
Working from the command line is your starting point. It’s how you’ll push your first image, test out a new tag, or run a quick debug session on your local machine. The process feels a lot like standard Docker commands, but the image naming convention is the key difference you need to master.
Pushing Your First Image from the CLI
Before you can push anything, you need to authenticate your Docker client with your GitLab Container Registry. This is a quick, one-time setup on your local machine.
Log in to the Registry: Fire up your terminal and use the
docker logincommand, pointing it to your registry’s URL. For GitLab.com, this is simplyregistry.gitlab.com. If you’re running a self-managed instance, you’ll use the URL you configured.# For GitLab.com users
docker login registry.gitlab.comYou’ll be prompted for your GitLab username and a personal access token. Make sure the token has both
read_registryandwrite_registrypermissions. Using a token is far more secure than using your main password.Tag Your Image Correctly: This is the most important step. To send an image to the GitLab Container Registry, you have to tag it with the full registry path. The format is always
<registry-url>/<group>/<project>/<image-name>:<tag>.Imagine you have a local image named
my-awesome-app:latestand your project lives atgitlab.com/my-group/my-project. You’d tag it like this:docker tag my-awesome-app:latest registry.gitlab.com/my-group/my-project/my-app:v1.0.0Push the Image: With the image correctly tagged, you can now push it straight to your project’s registry.
docker push registry.gitlab.com/my-group/my-project/my-app:v1.0.0
Once the push is done, head over to your project’s Deploy > Container Registry page in the GitLab UI. You should see your new image, my-app, listed with the v1.0.0 tag, ready to go.
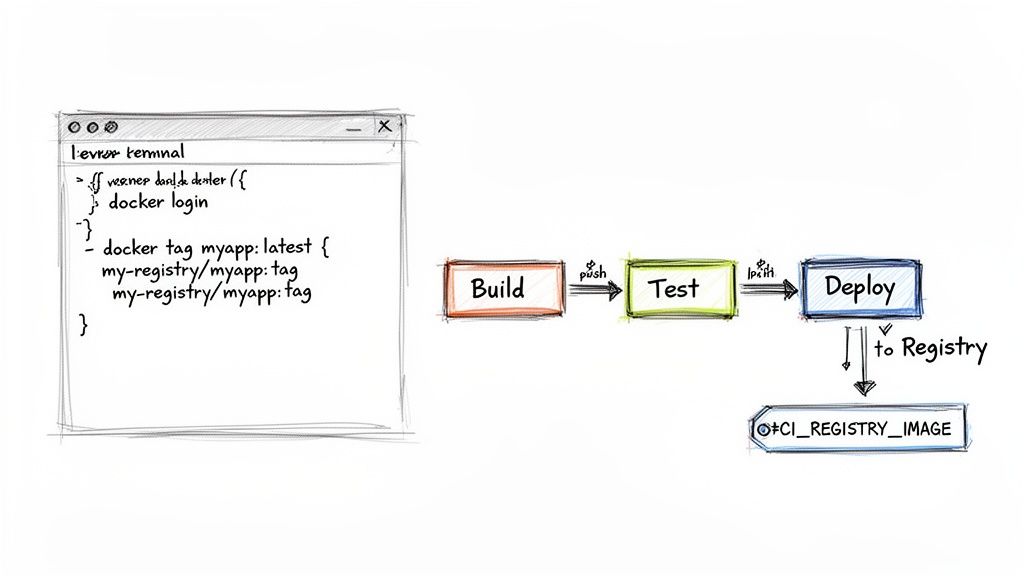
Automating Builds with GitLab CI/CD
Pushing images manually is great for getting started, but the real power comes from automating this with GitLab CI/CD. Your pipeline can build, tag, and push images on every single commit, creating a repeatable and error-free workflow. It all happens inside your .gitlab-ci.yml file.
To properly automate your image builds, you’ll need a good grasp of the pipeline configuration, which is all defined in the GitLab CI YML file.
The good news is that GitLab provides predefined CI/CD variables that make this incredibly easy. You don’t have to juggle credentials manually; GitLab injects a short-lived, secure token into every pipeline job.
The most useful variables are
$CI_REGISTRY_USER,$CI_REGISTRY_PASSWORD, and$CI_REGISTRY. These let your pipeline log in automatically. The$CI_REGISTRY_IMAGEvariable gives you the base URL for your project’s registry, which is perfect for dynamic tagging.
Here’s a practical example of a build job in your .gitlab-ci.yml that builds and pushes a Docker image:
build_image:
  stage: build
  image: docker:24
  services:
    - docker:24-dind
  before_script:
    # GitLab provides these variables automatically
    - docker login -u "$CI_REGISTRY_USER" -p "$CI_REGISTRY_PASSWORD" $CI_REGISTRY
  script:
    # Use the commit SHA for a unique, immutable tag
    - docker build -t "$CI_REGISTRY_IMAGE:$CI_COMMIT_SHA" .
    - docker push "$CI_REGISTRY_IMAGE:$CI_COMMIT_SHA"
This job uses the official Docker-in-Docker (dind) service so it can run Docker commands. It logs in with the built-in CI variables, builds the image from your Dockerfile, and tags it with the unique commit SHA ($CI_COMMIT_SHA). This is a fantastic practice for traceability, as it ensures every single commit produces a uniquely identifiable image.
Using Images in Downstream Jobs
Once an image is in your registry, other stages in your pipeline can pull it for tasks like running tests or deploying to production. Because we tagged the image with the unique commit SHA, you can be 100% sure you are testing the exact artifact that was just built.
Here’s how a test job could use the image we built in the last step:
test_application:
  stage: test
  # Use the image we just built and pushed
  image: "$CI_REGISTRY_IMAGE:$CI_COMMIT_SHA"
  script:
    # Run your application's test suite inside the container
    - echo "Running tests..."
    - npm test
This seamless handover between stages is what makes an integrated registry so powerful. There’s no ambiguity, no chance of pulling a stale latest tag, and no need for complex scripting. The build job creates the image, and the test job uses it, all within one unified pipeline. For a deeper dive into the specific variables available, check out our guide on how to use https://goregulus.com/cra-basics/gitlab-ci-variables/ effectively.
Managing Your Registry Storage and Costs
An unmanaged GitLab Container Registry can quickly become a digital attic, cluttered with old, unused images. Each time a CI/CD pipeline runs, it pushes a new image layer. Over weeks and months, these layers accumulate, consuming huge amounts of storage and driving up costs.
This isn’t just about digital housekeeping; it’s a strategic necessity. Uncontrolled registry growth leads to slower performance, bigger cloud bills, and a chaotic environment where finding the right image becomes a real challenge.
Fortunately, GitLab provides powerful, automated tools to keep your registry lean and efficient.
Implementing Automated Cleanup Policies
The most effective way to manage your registry is by setting up cleanup policies. These are automated rules you configure at the project level to periodically remove unnecessary image tags. Instead of manually deleting old images, you tell GitLab to do it for you based on criteria you define.
You can configure these rules right from your project’s UI by navigating to Settings > Packages & Registries > Cleanup policies. Here, you can define rules that match your team’s specific workflow.
A common and highly effective policy combines time and quantity. For example, you can set a rule to:
- Keep only the most recent images: For instance, always retain the last five tags pushed for each image name.
- Delete old tags: Automatically remove any tag that is older than 90 days.
- Preserve important tags: Use regex to protect specific tags from deletion, such as those matching a semantic versioning pattern like
v*.*.*.
By setting a rule to
Keep the most recent: 5 tags per image name, you ensure that your development and staging environments always have recent builds available, while automatically pruning older, irrelevant ones. This prevents the endless accumulation of feature-branch and test images.
This automated approach is critical for maintaining a clean, auditable, and cost-effective repository.
Understanding Storage Quotas and Notifications
While cleanup policies manage what gets deleted, storage quotas prevent your usage from spiralling out of control in the first place. On GitLab.com, namespaces have storage limits, and your container registry usage counts towards this total.
To help you stay ahead of these limits, GitLab has an automated notification system. You don’t have to manually check your usage every day. Instead, group owners receive email alerts when storage consumption hits key thresholds.
This table outlines the automated email notifications sent by GitLab as your group’s container registry storage approaches its limit, helping teams manage usage proactively.
GitLab Container Registry Quota Notifications
| Quota Usage Percentage | Notification Triggered | Recommended Action |
|---|---|---|
| 70% | First email warning | Review cleanup policies and identify large, unused images. |
| 85% | Second email warning | Plan to purchase additional storage or aggressively prune tags. |
| 95% | Third email warning | Your pipelines might soon fail; take immediate action. |
| 100% | Final notification | Project is read-only. You cannot push new images. |
This proactive system gives you plenty of time to act before your development workflow is disrupted.
The impact of these features is significant, especially at scale. A 2024 audit of 50 European Supercomputing research projects found that activating cleanup policies reduced storage usage by an average of 45%. These findings echo GitLab’s own success, where optimising cleanup slashed a 535 TiB registry’s processing time from 278 hours down to just 145 hours. You can read more about these container registry optimisations and their impact.
How Garbage Collection Reclaims Space
It’s important to understand that deleting a tag doesn’t immediately free up disk space. When you delete a tag, you are only removing a pointer to the image manifest. The underlying data layers—which other tags might still be using—remain in storage.
To actually reclaim the physical storage from these now-unreferenced layers, GitLab runs a process called online garbage collection.
This background task runs automatically on GitLab.com, sweeping through the registry to find and permanently delete orphaned image layers. This ensures the space is truly recovered. For self-managed instances, administrators may need to trigger this process manually.
Securing Your Container Image Supply Chain
In a modern development pipeline, security isn’t just a final checkbox; it’s part of the fabric. The GitLab Container Registry is built on this idea, giving you the tools to secure your container images from the moment they’re created. This moves security from a hurried, last-minute check to an automated, everyday part of your workflow.
The first line of defence is role-based access control (RBAC). Permissions for the registry aren’t managed in a separate system; they’re inherited directly from your project’s member roles. This simple but powerful link ensures only authorised users and CI/CD jobs can push (write) or pull (read) images, creating a clear and auditable chain of custody.
This built-in control mechanism stops unauthorised access cold and makes sure only validated pipelines can introduce new images into your environment. To maintain this level of control across all your cloud resources, it’s also worth understanding the practices behind Cloud Security Posture Management (CSPM).
A Quick Look at Roles and Permissions
To make this crystal clear, here’s a breakdown of the default permissions. Understanding who can do what is fundamental to implementing secure access control without getting in your team’s way.
GitLab User Roles and Registry Permissions
| Role | Pull Image (read_registry) | Push Image (write_registry) | Delete Image (write_registry) |
|---|---|---|---|
| Guest | ✓ | ✗ | ✗ |
| Reporter | ✓ | ✗ | ✗ |
| Developer | ✓ | ✓ | ✗ |
| Maintainer | ✓ | ✓ | ✓ |
| Owner | ✓ | ✓ | ✓ |
As you can see, the permissions are logical and follow the principle of least privilege. Developers can build and push images, but only Maintainers and Owners have the rights to delete them, preventing accidental or malicious removal.
Activating Integrated Container Scanning
While RBAC controls who has access, GitLab’s integrated container scanning finds the vulnerabilities hiding inside your images. The feature automatically inspects each image layer for known security flaws in its operating system packages and application dependencies. By adding it to your .gitlab-ci.yml file, you shift security left, finding and fixing problems long before they have a chance to hit production.
The process itself is refreshingly simple. You just include GitLab’s predefined Container-Scanning.gitlab-ci.yml template, and the pipeline handles the rest.
Here’s a practical example showing how to add a scanning job that runs right after your image is built and pushed to the registry:
stages:
  - build
  - test

include:
  - template: Jobs/Container-Scanning.gitlab-ci.yml

build_and_push:
  stage: build
  image: docker:24
  services:
    - docker:24-dind
  before_script:
    - docker login -u "$CI_REGISTRY_USER" -p "$CI_REGISTRY_PASSWORD" $CI_REGISTRY
  script:
    - docker build -t "$CI_REGISTRY_IMAGE:$CI_COMMIT_SHA" .
    - docker push "$CI_REGISTRY_IMAGE:$CI_COMMIT_SHA"

# The Container Scanning job from the template will automatically
# run in the 'test' stage, scanning the image we just pushed.
With this setup, every single merge request that builds an image will also trigger a full security scan.
Reviewing Vulnerabilities in Merge Requests
Once a scan finishes, the results pop up directly inside the merge request as an interactive widget. This gives developers immediate, actionable feedback right where they’re already working on the code.
A developer no longer has to switch contexts to a separate security tool, analyse a generic report, and try to map it back to their changes. The vulnerabilities are listed right there, complete with severity levels (Critical, High, Medium, Low) and links to CVE details.
This tight feedback loop is the bedrock of a healthy DevSecOps culture. It turns security from a gatekeeper’s checklist into a shared team responsibility, helping everyone build safer software from the very beginning. This process is also crucial for generating a Software Bill of Materials (SBOM), a core requirement of emerging regulations. To get a better handle on what’s expected, you can learn more about the CRA’s SBOM requirements in our detailed guide.
This integrated approach has proven its worth, especially in highly regulated industries. For compliance-focused businesses in the ES region, studies from 2025 showed that 92% of projects achieved GDPR readiness using features like at-rest encryption and issuer-based authentication. These numbers confirm the registry is mature enough to meet strict EU digital product standards. You can find more details on GitLab’s security configurations for compliance.
Advanced Registry Features and Best Practices

Once you’ve mastered the basics of storing and scanning images, it’s time to look at the advanced features that truly harden your software supply chain. These capabilities are less about day-to-day convenience and more about building resilience and audit-readiness, especially for teams facing strict compliance mandates.
One of the most powerful but often overlooked features is the pull-through cache. Think of it as a local, intelligent proxy for public registries like Docker Hub. When your CI pipeline pulls an image like node:20-alpine for the first time, GitLab fetches it and keeps a copy in your project’s own registry.
Every subsequent pull for that same image comes directly from your local cache. This simple change dramatically cuts down latency and, more importantly, shields your builds from external registry rate limits or outages. If Docker Hub has a bad day, your pipelines don’t.
Verifying Image Integrity with Signing
You can’t have a secure supply chain without certainty. Image signing provides that certainty by creating a cryptographic, tamper-proof link between the image you build and the image you deploy. It’s the digital equivalent of an unbroken seal on a shipping container.
A popular, cloud-native tool for this is Cosign, which fits perfectly into a GitLab CI/CD workflow. After an image is built and pushed, you simply add another job to the pipeline that signs it. Your deployment environment, like a Kubernetes cluster, can then be configured with a policy controller to check for a valid signature before ever starting a container.
Here’s what a simple signing job might look like in your .gitlab-ci.yml:
sign_image:
  stage: sign
  image: gcr.io/projectsigstore/cosign:v2.2.3
  script:
    # This assumes COSIGN_PRIVATE_KEY is a protected CI/CD variable
    - cosign sign --key env://COSIGN_PRIVATE_KEY "$CI_REGISTRY_IMAGE:$CI_COMMIT_SHA"
This step creates an immutable, verifiable record that is non-negotiable for modern compliance standards. You can discover more about integrating these deployment strategies by exploring our guide on using Terraform and Kubernetes.
Consolidated Best Practices Checklist
To operationalise these concepts and maintain a compliant, efficient GitLab Container Registry, here are the key practices your team should adopt.
- Use Immutable Tags: Never use mutable tags like
latestin production. Always deploy using specific, unchangeable tags like the commit SHA ($CI_COMMIT_SHA) or a semantic version (v1.2.3) to prevent accidental or untested updates from slipping into your environments. - Automate Security Scans on Every Build: Integrate container scanning into every single pipeline. This surfaces vulnerability reports directly in merge requests, empowering developers to fix issues long before they reach a production environment.
- Sign All Production Images: Make image signing with a tool like Cosign a mandatory step for any image destined for production. Just as importantly, enforce signature verification in your clusters to block any untrusted or unsigned images from running.
- Maintain a Lean Registry: Be ruthless with cleanup policies. A cluttered registry filled with old, untagged images drives up storage costs, slows down performance, and makes security audits a nightmare.
- Enable the Pull-Through Cache: If your builds rely on public images—and most do—configure the pull-through cache. It’s a simple way to boost both the reliability and speed of your entire CI/CD platform.
Frequently Asked Questions
Here are a few quick answers to some of the most common questions and roadblocks teams run into when they start working with the GitLab Container Registry.
How Do I Fix ‘Permission Denied’ Errors When Pushing?
A permission denied or unauthorized error almost always points to one of two things: your credentials or your user role in the project.
First, check your authentication.
- For CLI Pushes: Make sure you are using a Personal Access Token with both
read_registryandwrite_registryscopes. This is a common trip-up; you can’t use your regular account password here. - For CI/CD Jobs: This error is rare inside a pipeline because GitLab automatically provides temporary, scoped credentials. If you do see it, check your project’s CI/CD settings to see if the job token’s default permissions have been restricted.
Second, confirm your project role. To push an image, you need to be at least a Developer. If your role is Reporter or Guest, you only have permission to pull images, so any push attempt will be rejected.
Cleanup Policies vs. Manual Garbage Collection: What’s the Difference?
These two features work together, but they do different jobs. The best way to think about it is like managing files on your computer.
Cleanup policies are your ‘move to trash’ rule. You set a policy—like “delete all tags older than 90 days that match this pattern”—which automatically marks them for deletion. This removes the reference to the image layers, but it doesn’t immediately free up the storage space.
Manual garbage collection (or online garbage collection for GitLab.com users) is the ’empty the trash’ step. It’s a background process that permanently deletes the underlying data layers (blobs) that are no longer referenced by any tags. This is the step that actually reclaims the physical storage.
What Is the Best Way to Migrate from Another Registry?
Migrating from a registry like Docker Hub to the GitLab Container Registry is surprisingly straightforward and easy to script. The core process is simple: pull the image you want to migrate, re-tag it with its new GitLab destination path, and then push it.
Here’s a simple shell script that migrates a single image:
#!/bin/bash
# Define your image and GitLab project path
SOURCE_IMAGE="docker.io/your-username/your-app:1.2.3"
TARGET_IMAGE="registry.gitlab.com/your-group/your-project/your-app:1.2.3"

# 1. Pull the original image
echo "Pulling from source..."
docker pull $SOURCE_IMAGE

# 2. Re-tag the image for the GitLab registry
echo "Re-tagging for GitLab..."
docker tag $SOURCE_IMAGE $TARGET_IMAGE

# 3. Push the newly tagged image to GitLab
echo "Pushing to GitLab..."
docker push $TARGET_IMAGE

echo "Migration complete!"
You can easily expand this logic into a loop to handle all your images and tags, making the entire migration a repeatable, one-click process.
Gain clarity and confidence in meeting your EU regulatory obligations. Regulus provides a complete, actionable platform to assess your Cyber Resilience Act applicability, map your requirements, and build your compliance documentation. Get started today at https://goregulus.com.

