

When you’re staring down the barrel of modern compliance demands, especially regulations like the European Union’s Cyber Resilience Act (CRA), a Git CI/CD pipeline is your single most powerful ally. It takes what used to be a mountain of manual checklists for building, testing, and deploying software and transforms it into a smooth, auditable, and repeatable workflow. This kind of automation isn’t just a nice-to-have anymore; it’s a core requirement for any company looking to bring secure products to the EU market.
Why Git CI/CD Is Your Compliance Power Tool
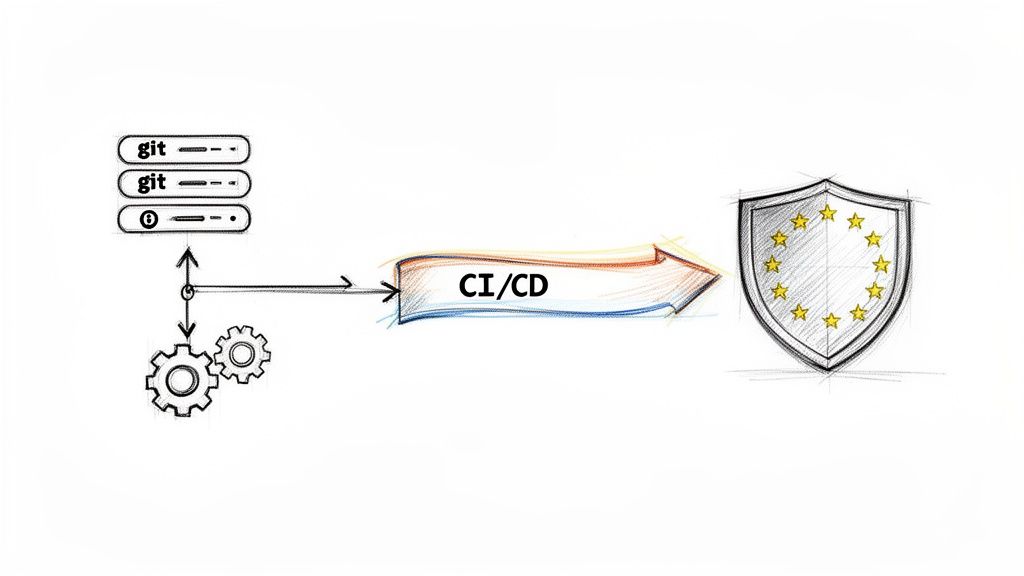
Let’s be honest, manual compliance processes are a nightmare. They’re slow, riddled with human error, and a real headache to audit effectively. A well-thought-out Git CI/CD pipeline tackles these problems head-on by weaving compliance checks directly into the fabric of your development lifecycle. Security and documentation stop being afterthoughts and instead become automated “quality gates” that every single code change must pass through.
This shift from manual box-ticking to automated enforcement gives teams facing the CRA some serious advantages:
- Continuous Verification: Security scans, dependency checks, and a whole battery of tests run automatically on every commit. You get constant, immediate feedback.
- Auditable Trail: Every action, from a code change to a final deployment, is logged and traceable right back to a specific commit and its author. This is exactly what regulators want to see.
- Enforced Standards: You can set up pipeline rules that physically prevent insecure code from ever being merged into a release branch. It’s like having a digital guardian enforcing best practices.
The European Push for Automated Compliance
It’s no surprise that CI/CD adoption has skyrocketed across the European Union, particularly in the manufacturing and IoT sectors getting ready for these new rules. In powerhouse economies like Germany, the UK, and across the Nordics, enterprise implementation rates are now pushing past 60%. This is largely driven by data sovereignty laws and the non-negotiable need for secure, auditable development.
This trend also shows a clear preference for self-hosted tools that offer greater control, like Jenkins (used by 35% of mid-sized firms) and GitLab CI (28%), which are perfect for meeting strict mandates around secure updates and vulnerability management. To dig deeper into these market shifts, the research on CI/CD adoption trends from JetBrains is well worth a read.
Of course, to really nail Git CI/CD, you first need a solid grasp of its foundation. This guide on What is Continuous Integration is a great place to start.
A robust Git CI/CD pipeline isn’t just about shipping features faster. It’s about building a machine that produces auditable, secure, and compliant software by default, turning a regulatory burden into a genuine strategic advantage.
By baking compliance directly into your automated workflows, you create a system where the “right way” is also the easiest way. This fundamentally changes your team’s relationship with security and regulatory duties, making them a natural part of the development process rather than a frantic scramble just before a release.
To make this connection more concrete, here’s a quick look at how specific CI/CD stages map directly to key CRA obligations.
Mapping CRA Requirements to CI CD Pipeline Stages
| CRA Requirement (Annex I) | Corresponding CI CD Stage | Key Benefit |
|---|---|---|
| Secure by Design (Sec. 1) | Static Application Security Testing (SAST) | Identifies coding flaws and insecure patterns before they are merged, enforcing secure coding standards automatically. |
| No Known Exploitable Vulnerabilities (Sec. 2) | Software Composition Analysis (SCA) & SBOM Generation | Scans for vulnerabilities in third-party libraries and generates a Software Bill of Materials (SBOM) for every build. |
| Security Update Management (Sec. 2) | Automated Build & Artefact Signing | Ensures every release artefact is built from a known source, verifiably signed, and securely stored for distribution. |
| Security Testing (Annex I) | Automated Testing (Unit, Integration, DAST) | Continuously validates that code changes haven't introduced new security flaws or broken existing controls. |
| Traceability & Documentation (Annex II) | Git History & Pipeline Logs | Creates a complete, immutable audit trail linking every code change to test results, builds, and deployments. |
This table shows how the pipeline isn't just a development tool—it's your primary evidence-gathering machine for demonstrating compliance. By automating these checks, you're not just hoping you're compliant; you're actively proving it with every single commit.
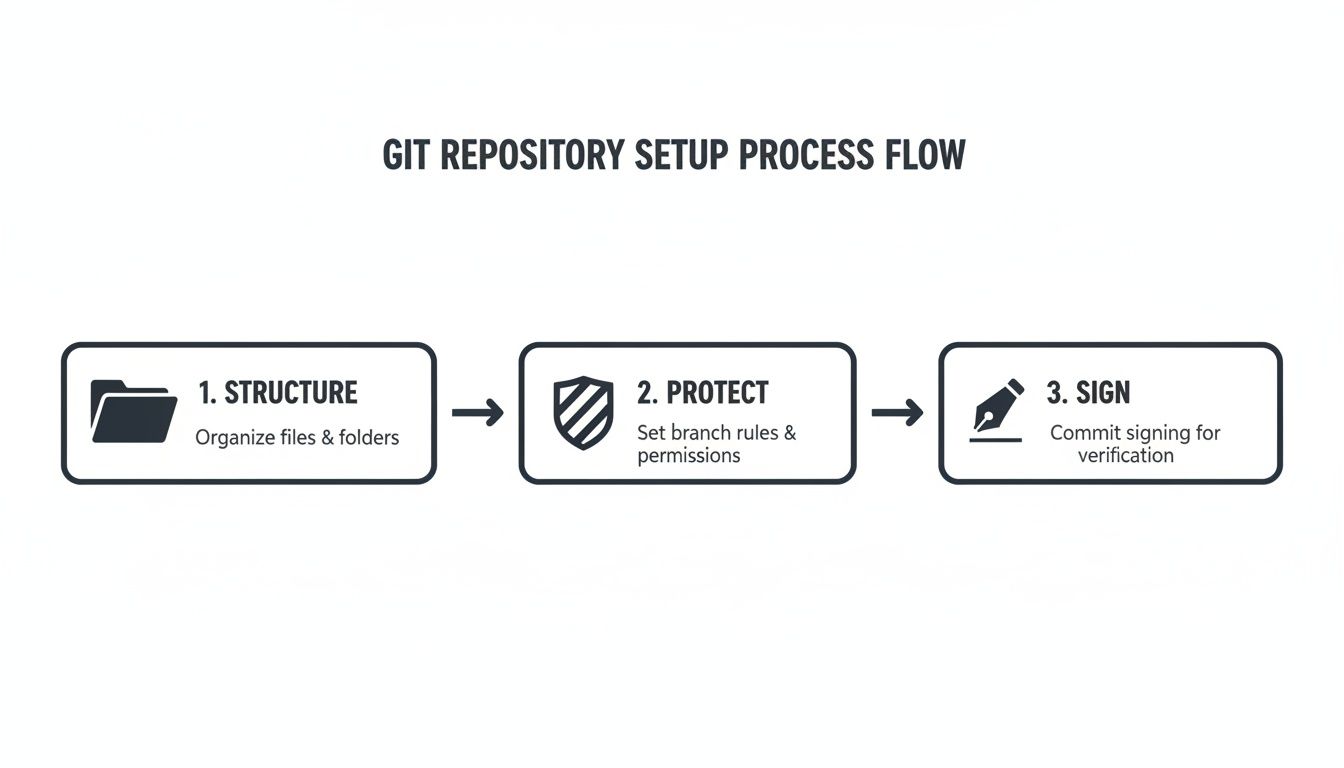
Designing Your Compliance-Ready Repository
A powerful Git CI/CD pipeline is only as good as its foundation, and that foundation is your repository structure. Before you even think about writing automation scripts, the first real step toward meeting compliance demands like the Cyber Resilience Act is establishing a secure, auditable repository. This is about more than just organising code; it’s about building a bulletproof, traceable history of every single change.
Choosing the Right Branching Strategy
Your branching strategy is the first big decision. For firmware and embedded systems, releases are often distinct events tied to specific hardware versions. In this world, a strategy like GitFlow is a natural fit. It provides a clean, logical separation between development, new features, and stable releases by using dedicated develop, main, and release branches. This disciplined workflow is fantastic for preventing experimental code from ever touching a production build.
On the other hand, you have trunk-based development, where everyone merges small, frequent changes into a single main branch. This model is incredibly effective in fast-moving software environments, but it lives and dies by the quality of its automated testing. Maintaining stability can be a real challenge for hardware-dependent projects, where a full test cycle might be slow or complex. For most firmware teams, a modified GitFlow offers a more stable and auditable path.
Enforcing Control with Protected Branches
Once you've settled on a strategy, your next move is to lock down your most important branches. Whether you're on GitHub or GitLab, setting up branch protection rules for your main and release branches isn't just a good idea—it's non-negotiable for compliance.
These rules are your gatekeepers. For example, in GitHub, you would navigate to your repository's Settings > Branches and add a rule for your main branch with these settings:
- Require a pull request before merging: Check this box.
- Require approvals: Set to at least
1. - Require status checks to pass before merging: Enable this and select your essential CI jobs, like
build,test, andsast-scan.
These controls ensure no code gets into a release without both automated validation and human oversight.
Protecting your main release branch isn’t just good practice; it's a fundamental control for proving your software development life cycle is secure. You create a system where every change is deliberately reviewed and automatically validated, building the evidence trail regulators need.
Creating an Unbreakable Audit Trail
Finally, to create unquestionable code provenance, your team needs to get into the habit of using signed commits. By signing every commit with a GPG key, each developer cryptographically proves they are the author of that specific change. It creates an unbreakable, auditable link from a person to a line of code.
To implement this, a developer first generates a GPG key pair. Then, they configure Git with their key:
# Tell Git which key to use for signing
git config --global user.signingkey YOUR_GPG_KEY_ID

# To sign a single commit
git commit -S -m "Your commit message"

# To sign all commits automatically
git config --global commit.gpgsign true
This practice is surprisingly simple to roll out but adds immense value to your technical documentation. It proves exactly who made every change and when, cementing the integrity of your codebase's entire history. For a deeper look at managing your repository's security posture, robust Security Configuration Management is essential to move beyond simple alerts to implement real fixes. You can also learn more about how these practices fit into a broader compliance framework by exploring what a secure software development life cycle entails.
Building Your Automated Security Checkpoints
Once your Git repository is properly structured and protected, it’s time to build the automated security checkpoints that are the heart and soul of a modern CI/CD pipeline. This is where the real magic happens. Automation becomes your ever-vigilant security guard, scanning every single change before it ever gets a chance to cause harm.
This proactive approach is the core idea behind DevSecOps, and its growth is accelerating. In the ES region, the drive to comply with the Cyber Resilience Act is a huge factor. As many as 75% of manufacturers are now embedding vulnerability management directly into their pipelines to get ahead of CRA penalties. This isn't just a local trend; the global CI/CD market is expected to rocket from $15 billion to $45 billion by 2033, and Europe's segment is growing fastest at 17% annually, largely thanks to this security-first mindset. For more on this, check out the analysis from Market Report Analytics.
Choosing Your CI CD Tool for CRA Compliance
Before diving into specific checks, you need the right tool for the job. Not all CI/CD platforms are created equal, especially when it comes to the security and compliance features needed for the CRA. Your choice will shape how easily you can integrate the automated checkpoints we’re about to discuss.
Here’s a quick comparison of some of the most popular tools I've seen teams use successfully, with a focus on what matters for CRA compliance.
| CI CD Tool | Best For | Key CRA-Related Features | Hosting Options |
|---|---|---|---|
| GitHub Actions | Teams already using GitHub; ease of use and a massive ecosystem of pre-built Actions. | Integrated secret scanning, CodeQL SAST, dependency graph, and a rich marketplace for security tools. | Cloud (GitHub-hosted) or Self-hosted runners. |
| GitLab CI/CD | All-in-one platform seekers; teams wanting a single tool for code, CI/CD, and security. | Built-in SAST, DAST, container scanning, and dependency checking. Strong compliance management features. | Cloud (SaaS) or Self-managed (on-premises/cloud). |
| Jenkins | Teams needing maximum flexibility and control; complex or legacy build environments. | Highly extensible with thousands of plugins for security scanning, pipeline management, and compliance reporting. | Self-hosted only, offering full control over the environment. |
Ultimately, the best tool is the one that fits your team’s existing workflow and technical needs. For teams new to CI/CD, GitHub Actions often provides the smoothest on-ramp. For those wanting an integrated suite, GitLab is a powerhouse. Jenkins remains the go-to for bespoke, complex pipelines where you need to control every single detail.
Integrating Static Application Security Testing
The very first checkpoint every single commit should pass is Static Application Security Testing (SAST). SAST tools are fantastic because they analyse your source code without actually running it, hunting for common programming errors, security flaws, and dodgy coding patterns. Think of it as an automated code review that flags potential nightmares like SQL injection or buffer overflows at the earliest possible moment.
This is where the secure repository setup you did earlier pays off. It creates a trusted foundation for all the automated scans that follow.
With a tool like GitHub Actions, adding a SAST scan is incredibly simple. You don’t need to build anything from scratch; you just use a pre-built Action. Here’s a real-world snippet that uses GitHub’s own CodeQL to scan a codebase on every push to the main branch or on any new pull request.
name: "CodeQL SAST Scan"

on:
  push:
    branches: [ "main" ]
  pull_request:
    branches: [ "main" ]

jobs:
  analyze:
    name: Analyze
    runs-on: ubuntu-latest
    permissions:
      actions: read
      contents: read
      security-events: write

    steps:
    - name: Checkout repository
      uses: actions/checkout@v4

    - name: Initialize CodeQL
      uses: github/codeql-action/init@v3
      with:
        languages: 'c-cpp' # Example for C/C++ firmware project

    - name: Autobuild
      uses: github/codeql-action/autobuild@v3

    - name: Perform CodeQL Analysis
      uses: github/codeql-action/analyze@v3
This workflow handles everything. If it finds high-severity issues, it fails the build and flags them right inside the pull request, preventing a merge until they’re fixed.
Tracking Dependencies with an SBOM
Your next critical checkpoint involves generating a Software Bill of Materials (SBOM). An SBOM is simply a detailed inventory of every third-party library, component, and dependency baked into your software. The Cyber Resilience Act makes this mandatory for a very good reason: you can’t secure what you don’t know you have.
By automating SBOM generation, the list stays perfectly accurate with every single build. You can then feed this SBOM into a vulnerability scanner to check for known Common Vulnerabilities and Exposures (CVEs) lurking in your dependencies. For a deep dive on this, have a look at our guide on using tools like the OWASP Dependency-Check.
Generating an SBOM on every build isn’t just about creating a static list. It’s about creating a dynamic, machine-readable inventory. This enables continuous monitoring for new vulnerabilities discovered in your software supply chain long after the product has shipped.
The great news is that a rich ecosystem of tools exists to help you do this. You don’t need to build security scanners from the ground up. By combining SAST, SBOM generation, and vulnerability scanning, you create a formidable set of automated security gates in your git ci cd pipeline, bringing you much closer to full CRA compliance.
Managing Secrets and Securing Release Artifacts
An automated pipeline that leaks credentials is far more dangerous than having no pipeline at all. Once you’ve got your security checkpoints dialled in, the next crucial step in your git ci cd workflow is mastering secrets management and guaranteeing the integrity of your final release artifacts.
Let’s be blunt: hardcoding API keys, passwords, or signing keys directly into your pipeline scripts is a security disaster waiting to happen. This isn’t just bad practice; it creates a massive vulnerability. If your repository is ever compromised—even a private one—those credentials are laid bare for anyone to find.
Instead, you absolutely must use a dedicated secrets management solution. The good news is that tools like GitHub Actions, GitLab CI, and Jenkins all provide built-in mechanisms for securely storing this kind of sensitive information.
For example, in GitHub Actions, you use Repository Secrets. These are encrypted environment variables that the pipeline can only access during a run. You define them in your repository settings, completely separate from your code, creating a vital firewall between your logic and your credentials.
Securely Managing Your Credentials
Storing secrets properly is the first half of the battle. The workflow is straightforward: you define a secret like GPG_SIGNING_KEY or API_TOKEN in the UI, and then you simply reference it in your workflow file.
This approach ensures sensitive data is never exposed in logs or accidentally committed to your Git history. Here’s a quick rundown of how the top tools handle this:
- GitHub Secrets: Stored at the repository or organisation level and injected as environment variables. Accessed in a workflow with
${{ secrets.YOUR_SECRET_NAME }}. - GitLab CI/CD Variables: Can be defined as “protected” (only available on protected branches) and “masked” (hidden from job logs). Accessed as a standard environment variable
$YOUR_VARIABLE_NAME. - HashiCorp Vault: A more advanced, centralised solution for managing secrets across multiple tools and environments, often integrated with Jenkins for complex setups.
The core principle is simple but non-negotiable: Treat secrets like you would a password. Never commit them to your repository. Always use your CI/CD tool’s built-in secrets management or a dedicated vault to keep them secure and isolated from your codebase.
This practice is the bedrock of a trusted and secure automation process.
Signing and Verifying Your Build Artifacts
With your secrets handled, the focus shifts to your build artifacts—the compiled firmware images or software binaries your pipeline produces. For Cyber Resilience Act compliance, you must be able to prove that the software running on a device is exactly what you built and that it hasn’t been tampered with.
This is where cryptographic signing comes in.
Signing an artifact creates a digital signature that verifies its authenticity and integrity, a core requirement for any secure update mechanism. Automating this process within your git ci cd pipeline ensures every single release is consistently and correctly signed. The information required for creating a Software Bill of Materials is also closely tied to this process. For a deeper dive, you can learn about CRA SBOM requirements in our dedicated guide.
Let’s look at a practical example. Here’s a GitHub Actions snippet that uses a GPG key (stored as a secret, of course) to automatically sign a release artifact.
- name: Sign the release artifact
  env:
    GPG_PASSPHRASE: ${{ secrets.GPG_PASSPHRASE }}
  run: |
    # Import the GPG key from secrets
    echo "${{ secrets.GPG_PRIVATE_KEY }}" | gpg --batch --import

    # Sign the firmware binary
    gpg --output firmware.bin.sig --detach-sig firmware.bin
In this job step, the pipeline imports a private GPG key stored securely in secrets.GPG_PRIVATE_KEY. It then uses it to create a signature file (firmware.bin.sig) for the compiled binary. This signed artifact and its signature are then ready to be uploaded to your release storage for secure delivery to your devices.
Automating Compliance Paperwork and Secure Updates
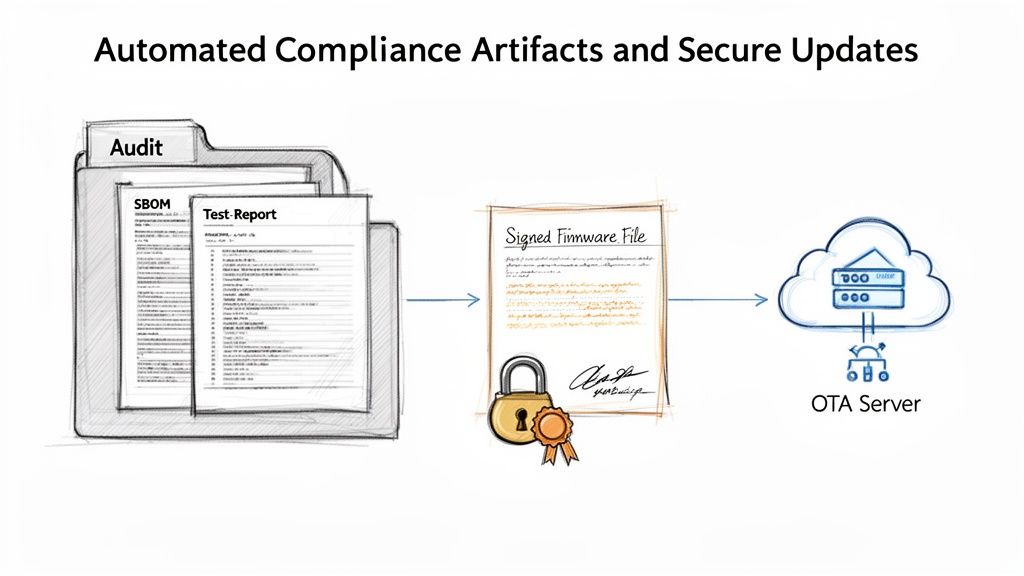
So, your git ci cd pipeline has built, tested, and secured your code. Great. But its job isn’t finished until it can prove its work. This final mile is where you transform your pipeline from a development tool into a compliance machine, automatically generating the evidence regulators demand and securely delivering the final product.
The goal is to configure your pipeline to collect all the crucial outputs—test results, security scan reports, SBOMs, and signed binaries—and archive them as organised, version-controlled artifacts. Think of this as building your Cyber Resilience Act technical file with every single successful build. You’re creating an auditable paper trail by default.
This practice is quickly becoming standard, especially in the ES region. While GitHub Actions dominates personal projects in Europe with 62% usage, enterprises often favour tools like Jenkins or GitLab CI, which offer more robust traceability. For firmware manufacturers, the results are tangible; one Spanish connected hardware firm saw 50% faster release cycles after adopting GitLab CI. They managed this by embedding vulnerability scans that caught 92% of issues before deployment, feeding directly into their compliance documentation. You can find more insights on CI/CD adoption in this market analysis report.
Building Your Auditable Evidence Locker
Configuring your pipeline to gather compliance artifacts is surprisingly straightforward. Most CI/CD tools have built-in functions to archive files produced during a job run. It’s as simple as creating a dedicated stage at the end of your pipeline that collects all the reports you need into a single, structured folder.
A practical example in GitLab CI (.gitlab-ci.yml) would look like this:
archive_compliance_job:
  stage: release
  script:
    # Create a directory to hold all evidence
    - mkdir -p compliance_artifacts
    # Copy all relevant reports into the directory
    - cp target/surefire-reports/TEST-*.xml compliance_artifacts/
    - cp sast-results.json compliance_artifacts/
    - cp sbom.spdx compliance_artifacts/
  artifacts:
    name: "compliance-docs-${CI_COMMIT_TAG}"
    paths:
      - compliance_artifacts/
    when: on_success
This job bundles test reports, SAST results, and the SBOM into a single compliance_artifacts folder, which is then archived and made available for download with every successful pipeline run on a tagged release.
Automating Secure Over The Air Updates
With your compliance evidence neatly archived, the final step is continuous delivery. This means automatically pushing your signed firmware update to a secure distribution point, like an Over-the-Air (OTA) update server or an artifact repository such as JFrog Artifactory.
Automating the final delivery step is critical. It eliminates the risk of human error—like deploying an unsigned or incorrect firmware version—and completes the chain of custody from code commit to deployed device.
Let’s see this in action with a GitHub Actions example. This snippet would run after your build and signing stages, publishing the signed firmware and its associated compliance artifacts as a formal GitHub Release.
- name: Create Release and Upload Artifacts
  uses: softprops/action-gh-release@v1
  with:
    files: |
      firmware.bin
      firmware.bin.sig
      compliance_reports.zip
    tag_name: ${{ github.ref }}
    name: Release ${{ github.ref_name }}
    body: "Automated release of version ${{ github.ref_name }}."
This simple step closes the loop on your git ci cd pipeline. It creates a complete, end-to-end process that not only builds a secure product but also delivers it safely. Most importantly, it provides the verifiable proof required to meet stringent regulations. To understand how this fits into the broader regulatory picture, read our guide on CRA update requirements.
Answering Your Top Questions About Git CI/CD and the CRA
When teams start connecting the dots between their git ci cd pipelines and the Cyber Resilience Act, a handful of practical questions always come up. Engineering and compliance leads want to know where to start, how far to push automation, and what “good enough” actually looks like. Let’s tackle some of the most common ones we hear.
How Much Automation Do We Really Need for the CRA?
The CRA doesn’t hand you a checklist demanding a specific CI/CD tool or a set number of pipeline stages. What it does require is a secure, repeatable, and documented software development lifecycle. Automation just happens to be the most reliable way to deliver that.
At a minimum, a compliant pipeline should automate these core steps:
- Building: Consistently compiling your code from a known, version-controlled source.
- Security Scanning: Running SAST and vulnerability checks on every meaningful change.
- Testing: Executing automated tests that validate both functionality and security controls.
- Artifact Generation: Creating your SBOM and signing the final release binaries.
From there, the depth of your automation will naturally scale with your product’s risk classification under the CRA. A critical industrial controller will demand more rigour than a simple consumer gadget.
The objective isn’t to automate 100% of every task you can think of. It’s about automating the critical checkpoints that prove your product was built securely, its components are known, and its integrity can be verified. Nail that foundation first, then build on it as your processes mature.
Can We Stick With Our Existing Jenkins Setup?
Absolutely. The principles of a secure git ci cd pipeline are the same no matter the tool. Whether you’re on Jenkins, GitHub Actions, or GitLab CI, the fundamental compliance goals don’t change: you need traceability, automated security gates, and verifiable artifacts.
If you’re running a self-hosted tool like Jenkins, the main thing is to make sure the server itself is locked down. That means tight access controls, securing credentials with a proper secrets manager like HashiCorp Vault, and ensuring your build environments are clean and isolated for each run.
A practical example is using a Jenkinsfile to define your pipeline as code, which keeps your build logic version-controlled.
pipeline {
    agent any
    stages {
        stage('Build') {
            steps {
                sh 'make'
            }
        }
        stage('Test') {
            steps {
                sh 'make check'
            }
            post {
                always {
                    junit 'build/test-results/**/*.xml'
                }
            }
        }
        stage('Security Scan') {
            steps {
                // Example using the OWASP Dependency-Check plugin
                dependencyCheck additionalArguments: '--scan .', odcInstallation: 'Dependency-Check'
            }
        }
    }
}
This Jenkinsfile defines a clear, auditable process. Your focus should always be on the process the tool enables, not on the tool itself.
At Regulus, we help you translate EU regulations into clear development practices. Our platform maps CRA requirements directly to your product, helps you generate the essential documentation, and builds an actionable compliance roadmap your engineering teams can actually follow. Discover how Regulus can prepare you for the Cyber Resilience Act.


